Mastering Flowcharts in Google Docs: A Complete Information
Associated Articles: Mastering Flowcharts in Google Docs: A Complete Information
Introduction
With nice pleasure, we are going to discover the intriguing subject associated to Mastering Flowcharts in Google Docs: A Complete Information. Let’s weave fascinating info and supply contemporary views to the readers.
Desk of Content material
Mastering Flowcharts in Google Docs: A Complete Information

Flowcharts are highly effective visible instruments used to signify algorithms, workflows, and processes. Their readability makes them invaluable for planning tasks, documenting procedures, troubleshooting issues, and speaking advanced concepts successfully. Whereas devoted diagramming software program affords superior options, Google Docs supplies a surprisingly succesful surroundings for creating easy but efficient flowcharts, particularly for fast sketches and collaborative tasks. This text explores varied strategies for creating flowcharts in Google Docs, masking all the pieces from fundamental shapes to superior strategies for enhanced readability {and professional} presentation.
Technique 1: Using Google Docs’ Drawing Instruments for Primary Flowcharts
Google Docs’ built-in drawing instruments supply an easy method to creating fundamental flowcharts. This technique is good for easy diagrams and does not require any exterior purposes or add-ons.
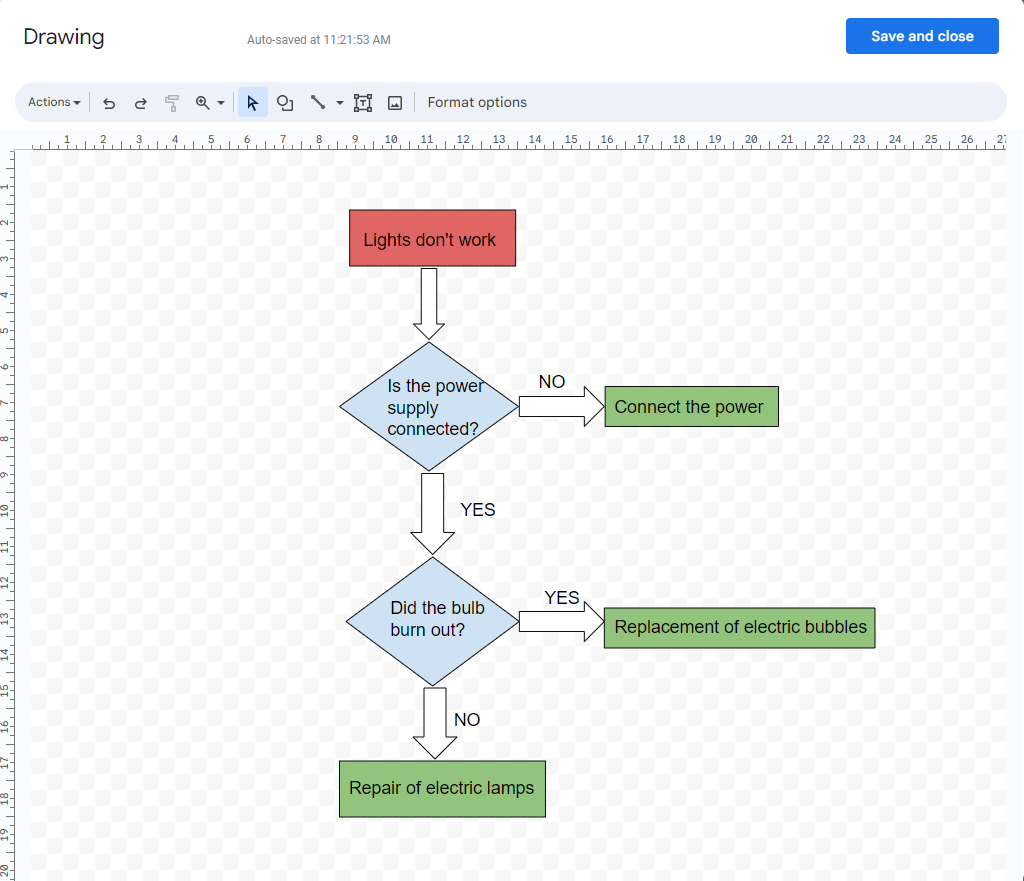
Step 1: Inserting the Drawing:
Navigate to your Google Doc. Click on on "Insert" within the menu bar, then choose "Drawing." A drawing canvas will seem inside your doc.
Step 2: Deciding on Shapes:
The drawing toolbar affords a spread of shapes appropriate for flowchart creation. Widespread shapes embrace:
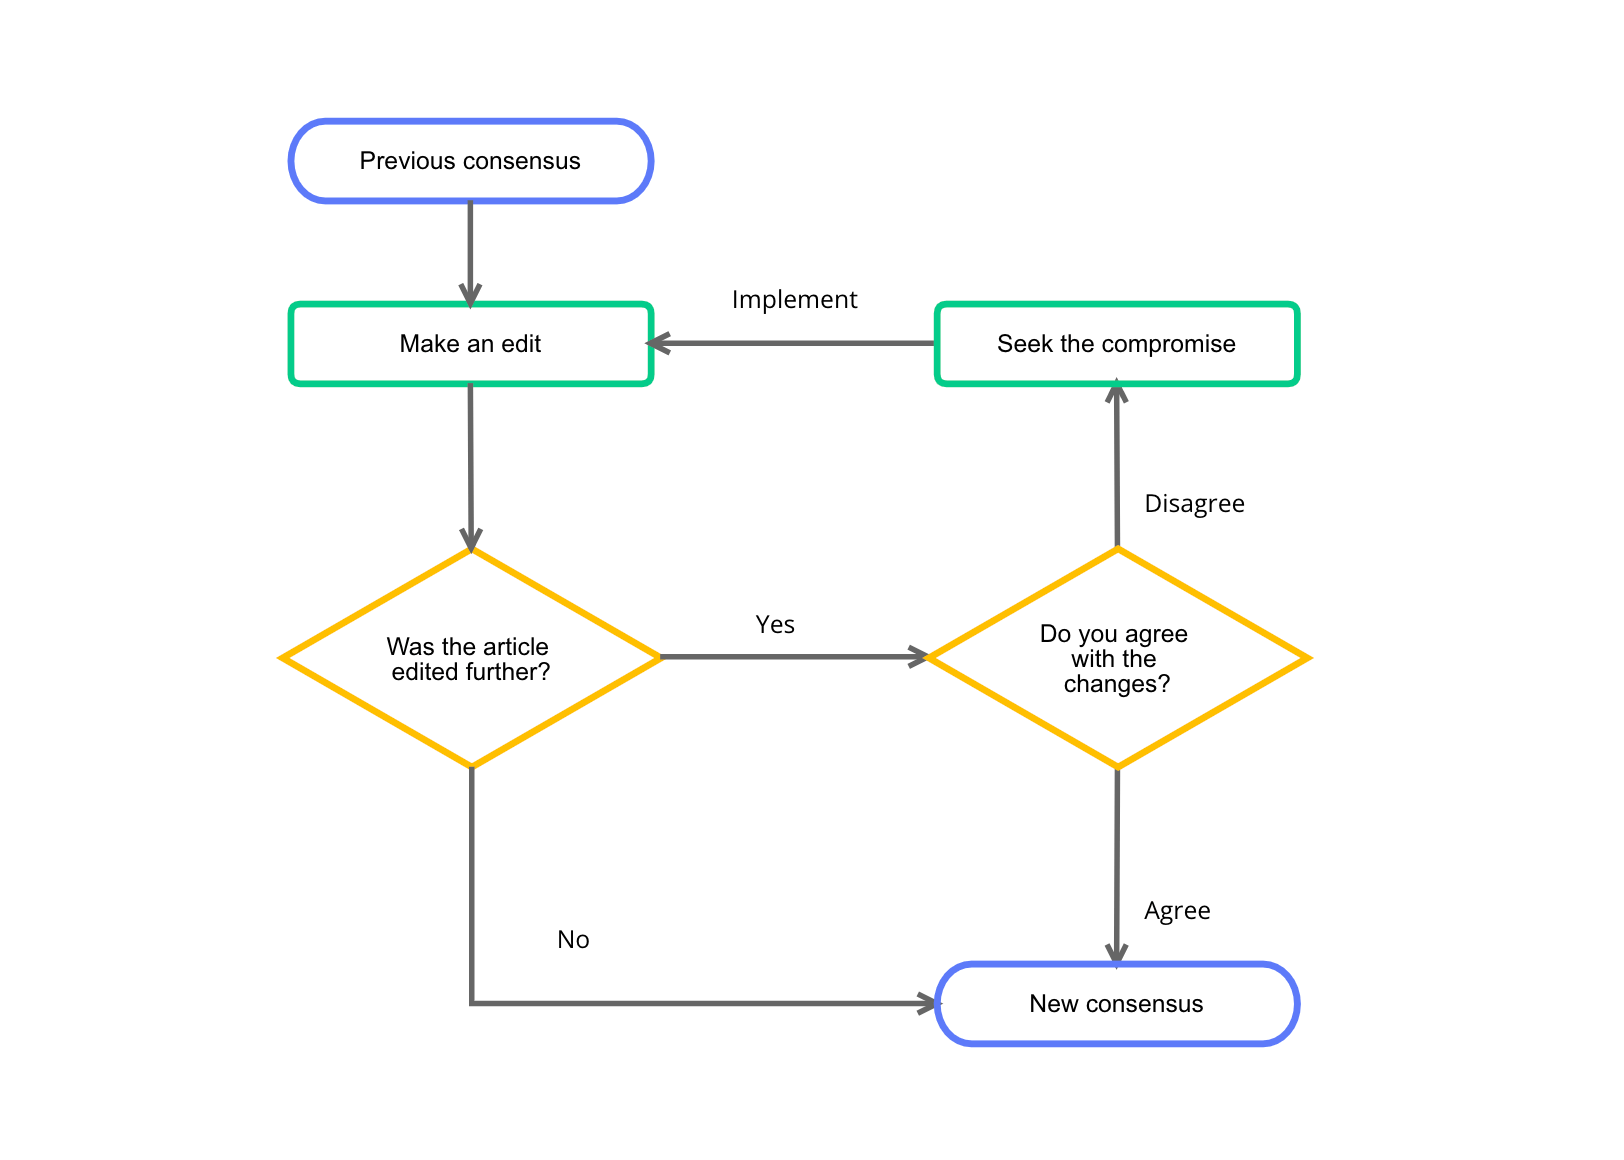
- Rectangles: Symbolize processes or actions.
- Diamonds: Symbolize resolution factors or conditional statements.
- Ovals or Rounded Rectangles: Symbolize begin and finish factors.
- Parallelograms: Symbolize enter or output.
Click on on the form you want and draw it on the canvas. Resize and reposition shapes utilizing the handles that seem round them.
Step 3: Including Textual content:
Double-click inside a form so as to add textual content describing the method, resolution, or enter/output. You’ll be able to format the textual content utilizing the textual content formatting choices inside the drawing toolbar (font, dimension, coloration, alignment, and many others.).
Step 4: Connecting Shapes:
Use the road device to attach shapes and point out the movement of the method. You’ll be able to select totally different line types (strong, dashed, dotted) and arrowheads to boost readability. Guarantee your traces precisely replicate the sequence of operations.
Step 5: Saving and Embedding:
As soon as your flowchart is full, click on "Save & Shut" within the drawing toolbar. The flowchart will likely be embedded in your Google Doc as a picture. You’ll be able to resize and reposition the embedded picture as wanted.
Limitations of the Primary Technique:
Whereas this technique is simple and accessible, it has limitations:
- Restricted Form Choices: The out there shapes are fundamental. Extra specialised flowchart symbols is likely to be unavailable.
- Handbook Alignment: Exact alignment of shapes and features requires cautious handbook adjustment.
- Lack of Superior Options: Options like automated form connection, layering, and superior formatting choices are absent.
Technique 2: Leveraging Google Drawings for Enhanced Flowcharts
Google Drawings, a standalone software accessible via Google Drive, supplies a extra highly effective surroundings for flowchart creation. It affords higher flexibility and management in comparison with the built-in drawing device in Google Docs.
Step 1: Making a New Google Drawing:
Go to Google Drive and create a brand new Google Drawing file.
Step 2: Using the Form Library:
Google Drawings affords a greater variety of shapes than Google Docs’ built-in drawing device. Discover the form library to seek out applicable symbols in your flowchart. You’ll be able to seek for particular shapes like "resolution diamond" or "course of rectangle."
Step 3: Superior Formatting Choices:
Google Drawings permits for extra superior textual content formatting, together with using totally different fonts, types, and colours. You may as well alter line thickness, coloration, and elegance for improved visible enchantment.
Step 4: Grouping and Layering:
Group associated shapes collectively for simpler manipulation and group. Use layering to make sure that traces are positioned behind shapes, stopping visible litter.
Step 5: Exporting and Embedding:
As soon as your flowchart is full, obtain it as a picture (PNG, JPEG, or SVG) after which insert it into your Google Doc utilizing the "Insert" > "Picture" choice.
Benefits of Utilizing Google Drawings:
- Expanded Form Library: Gives a wider collection of shapes, together with specialised flowchart symbols.
- Improved Formatting: Gives extra management over textual content and line formatting.
- Grouping and Layering: Allows higher group and cleaner visuals.
- Collaboration: Permits for real-time collaboration with others.
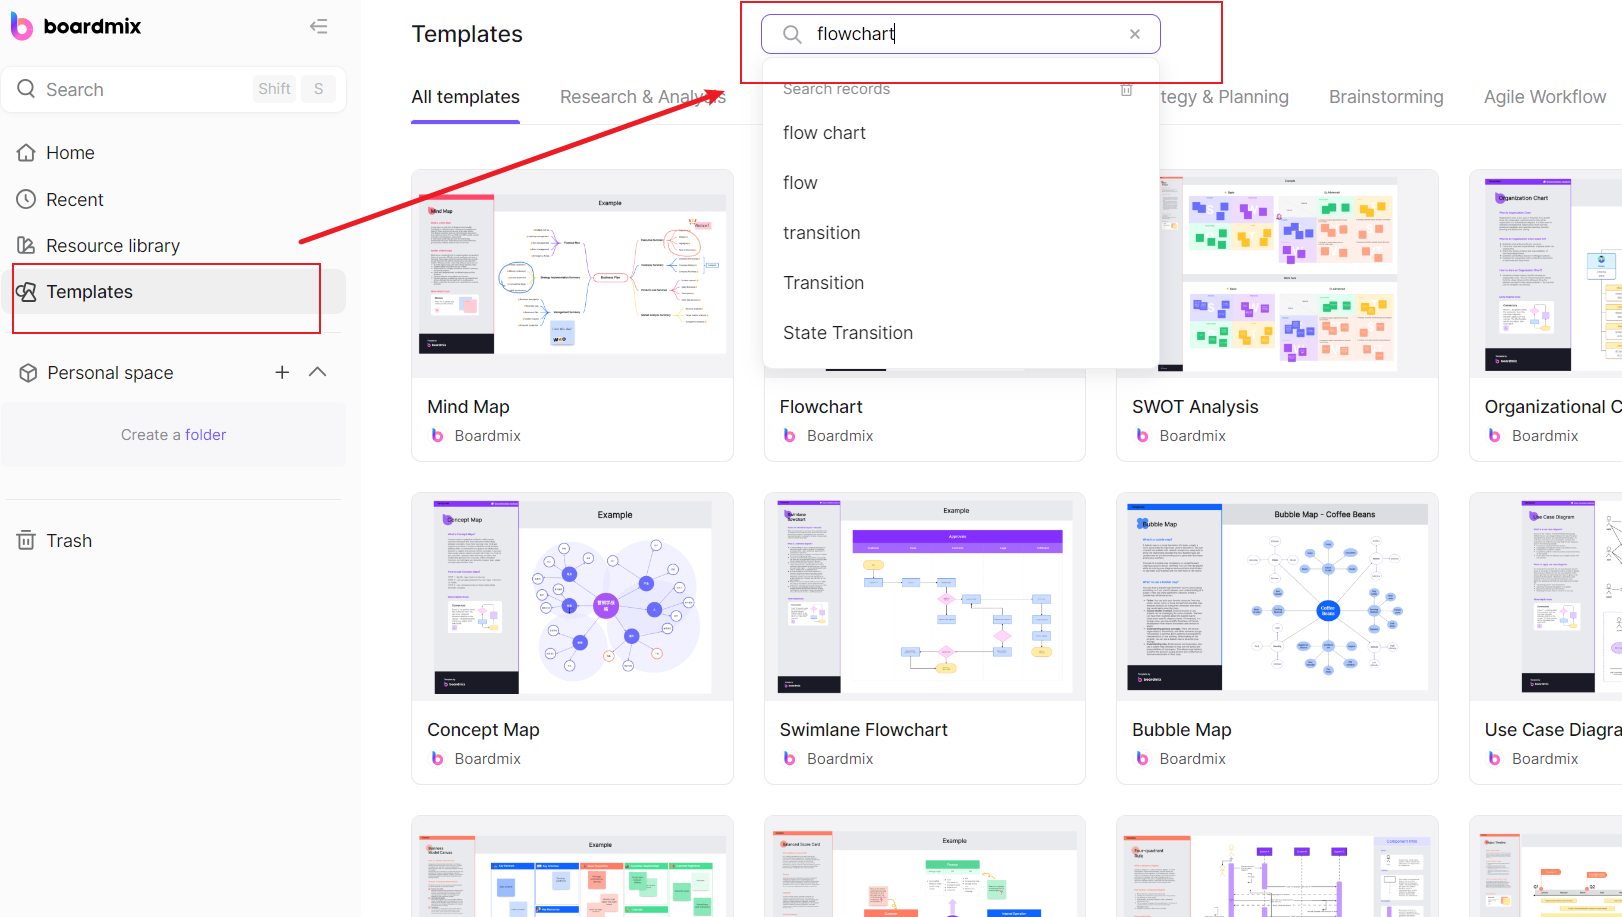
Technique 3: Using Third-Occasion Add-ons (Superior Methods)
A number of third-party add-ons prolong Google Docs’ capabilities for flowchart creation. These add-ons typically supply extra superior options like automated form connection, stencil libraries, and export choices. Examples embrace Lucidchart and Draw.io. The precise steps for utilizing these add-ons differ relying on the chosen device, however typically contain putting in the add-on, making a flowchart inside the add-on’s interface, after which embedding the completed diagram into your Google Doc.
Benefits of Add-ons:
- Superior Options: Provide options like automated structure, stencil libraries, and superior form connections.
- Skilled Look: Produce high-quality, visually interesting flowcharts.
- Collaboration: Many add-ons assist real-time collaboration.
Selecting the Proper Technique:
One of the best technique for creating flowcharts in Google Docs is dependent upon your wants and technical expertise.
- Primary Technique (Google Docs Drawing): Appropriate for easy, fast flowcharts with minimal shapes and connections.
- Google Drawings: Splendid for extra advanced flowcharts requiring a wider vary of shapes, superior formatting, and higher group.
- Third-Occasion Add-ons: Advisable for professional-quality flowcharts with superior options and collaborative capabilities.
Suggestions for Creating Efficient Flowcharts:
- Use clear and concise labels: Keep away from ambiguity in your descriptions.
- Preserve constant formatting: Use a constant model for shapes, traces, and textual content.
- Preserve it easy: Keep away from extreme element; deal with the important steps.
- Use applicable symbols: Select symbols that precisely signify the weather of your course of.
- Overview and revise: Verify your flowchart for accuracy and readability earlier than finalizing it.
By mastering these strategies, you’ll be able to leverage the facility of Google Docs to create clear, efficient, and visually interesting flowcharts for varied functions, from private venture planning to skilled displays. Keep in mind to decide on the tactic that most closely fits your particular wants and complexity of your venture, all the time prioritizing readability and understanding in your visible illustration.


![[Complete Guide] Create a Flowchart in Google Docs](https://cms.boardmix.com/images/articles/google-flowchart.png)
Closure
Thus, we hope this text has supplied useful insights into Mastering Flowcharts in Google Docs: A Complete Information. We thanks for taking the time to learn this text. See you in our subsequent article!